Back from the Dead: Recovering from a Bricked BIOS
My long-term laptop, which accompanied me for some years, died some time ago while proceeding a BIOS update. Why update the BIOS since it’s a process well-known for bricking computers? Well, because of Intel and their wonderful speculative execution vulnerabilities. So, after the update, the PC did not turn on again (with only the fans and the keyboard backlight turning on). As you can imagine doing the typical BIOS reset procedures did not work. So here’s the story of bringing it back from the dead.

A little background
So, I typically tend (and try) to buy machines that seem pretty reliable and easy to repair even if that comes with sacrificing my back a little. So, after carrying an Asus machine for some years, the low screen resolution – 1366x768 – on a 15.6’’ screen became a pain to develop software with. As a result, back in 2016, I brought a 17.3’’ war machine, a MSI PE70 6QE which resulted in sacrificing my back once again.

The machine was pretty reliable for all its life; however, its processor, a 6th-generation Skylake-H Intel® Core™ i7-6700HQ, was amongst the ones affected with the Meltdown and Spectre vulnerabilities. This Intel-powered vulnerability could allow an attacker to grab information currently being processed on the computer by running a malicious program to get data from other running programs (which is not supposed to happen).
Updating and Bricking the BIOS
The process to update the BIOS seemed pretty straightforward: download the BIOS file, put the file on a USB drive, enter BIOS, update, confirm. The process went as expected with an “Updated Successfully” message at the end. However, from that point on, the PC never booted again. To recover it, I tried several things:
-
Pressed the BIOS reset button. No effect.
-
Removed the CMOS battery (CR2032) and power-cycled the PC (by trying to turn it on with the battery and charger unplugged). Installed the battery again and no sign of life.
-
Tried to flash it again by connecting a USB flash drive with every possible BIOS recovery nomenclature (
SUPPER.ROM,*.BIO,AMIBIOS.ROM, …), which yield nothing.
All the MSI forums pointed out that the only solution was to ship the PC to be repaired in their repair centres. However, my warranty was long gone, so that was a no-go.
The Portuguese hardware repair stores
With no other tools to proceed to the BIOS recovery, and, also, already starting to doubt if that BIOS was really the issue, I took the PC to two different hardware repair stores. The results were a bit unexpected:
-
One store stated (with no diagnostic procedure) that the only way to fix the issue was to replace the whole motherboard (approximated cost of 80€). I thought that was no solution, so I refused the proposal.
-
The other store stated that they needed to do some diagnostic to state if they were able to fix the issue (
this gave me some hope). After three weeks, they notified me to pick up the PC in the store. The same notification also stated that no reparation had been done since they could not fix nor find the issue.
With no prospects of finding any repair stores that could fix my issue I gave up (for a while), and I brought a new PC along the way.
Bringing MSI Back from the Dead
Some time ago, due to my interest in starting to reverse engineering IoT stuff, I began to look around for some cheap tools that I could use to get their firmware out from the chips and understand what the devices are doing. Among those tools was a CH341A Mini Programmer which costs around 4€ and comes already with some helpful auxiliary tools such as an 8 Pin test clip.
CH341A is a USB interface chip that can emulate UART communication, standard parallel port, memory parallel port and synchronous serial (I2C, SPI).1
With this device, I could dump the firmware from a wide range of different serial flash memories (SPIflash) such as the ones typically used to “store” the BIOS program on PC. With some further reading, I found out that this device was pretty known among the BIOS modding community, and, although the lack of official documentation, an extensive amount of community-based documentation is available.
So, why not trying to fix the laptop? At least it can’t get any worse.
The process seems rather simple: open the laptop, remove every power source (including the CMOS), find the BIOS chip, connect the clip and the clip to the CH341A, connect to the PC and use one of the available tools to flash with the new firmware from the MSI website.
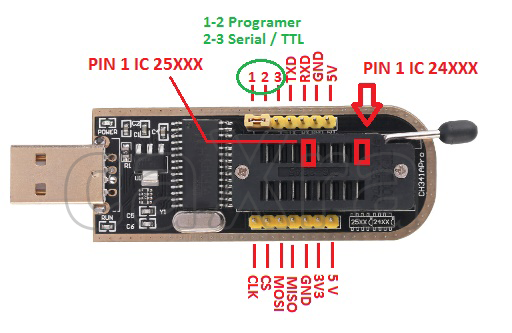
First thing first, let’s identify the BIOS SPIflash. Typically, this chip is physically close to the CMOS battery, so there’s a candidate with high probability highlighted in RED in the board picture. However, there are some other chips (highlighted in YELLOW) that are probably other SPIflashes (with other responsibilities). Nonetheless, before bricking anything else, let’s check the markings on those chips 2.
One of the YELLOW ones had some MX IC markings, and while this chip is mentioned in several forums, it didn’t seem to be the BIOS one.
The only readable markings in the RED chip were “25864CS1G”. After some search a GitHub repository poped up, which talked about modding the BIOS of a Lenovo laptop. It is common for different PC manufactures to use similar or equal chips, so this was a red flag: maybe this is the one. So the blog further documents the chip and the flashing procedure 3:
The BIOS chip was named “25864CS1G”. This is one of the Winbond’s 8MByte/64MBit serial flash memory ICs. I used CH341A as the programmer and flashed it in “W25Q64FW” category. Also, don’t forget that you will need a SOP8 crocodile and remove battery/BIOS battery before flashing.
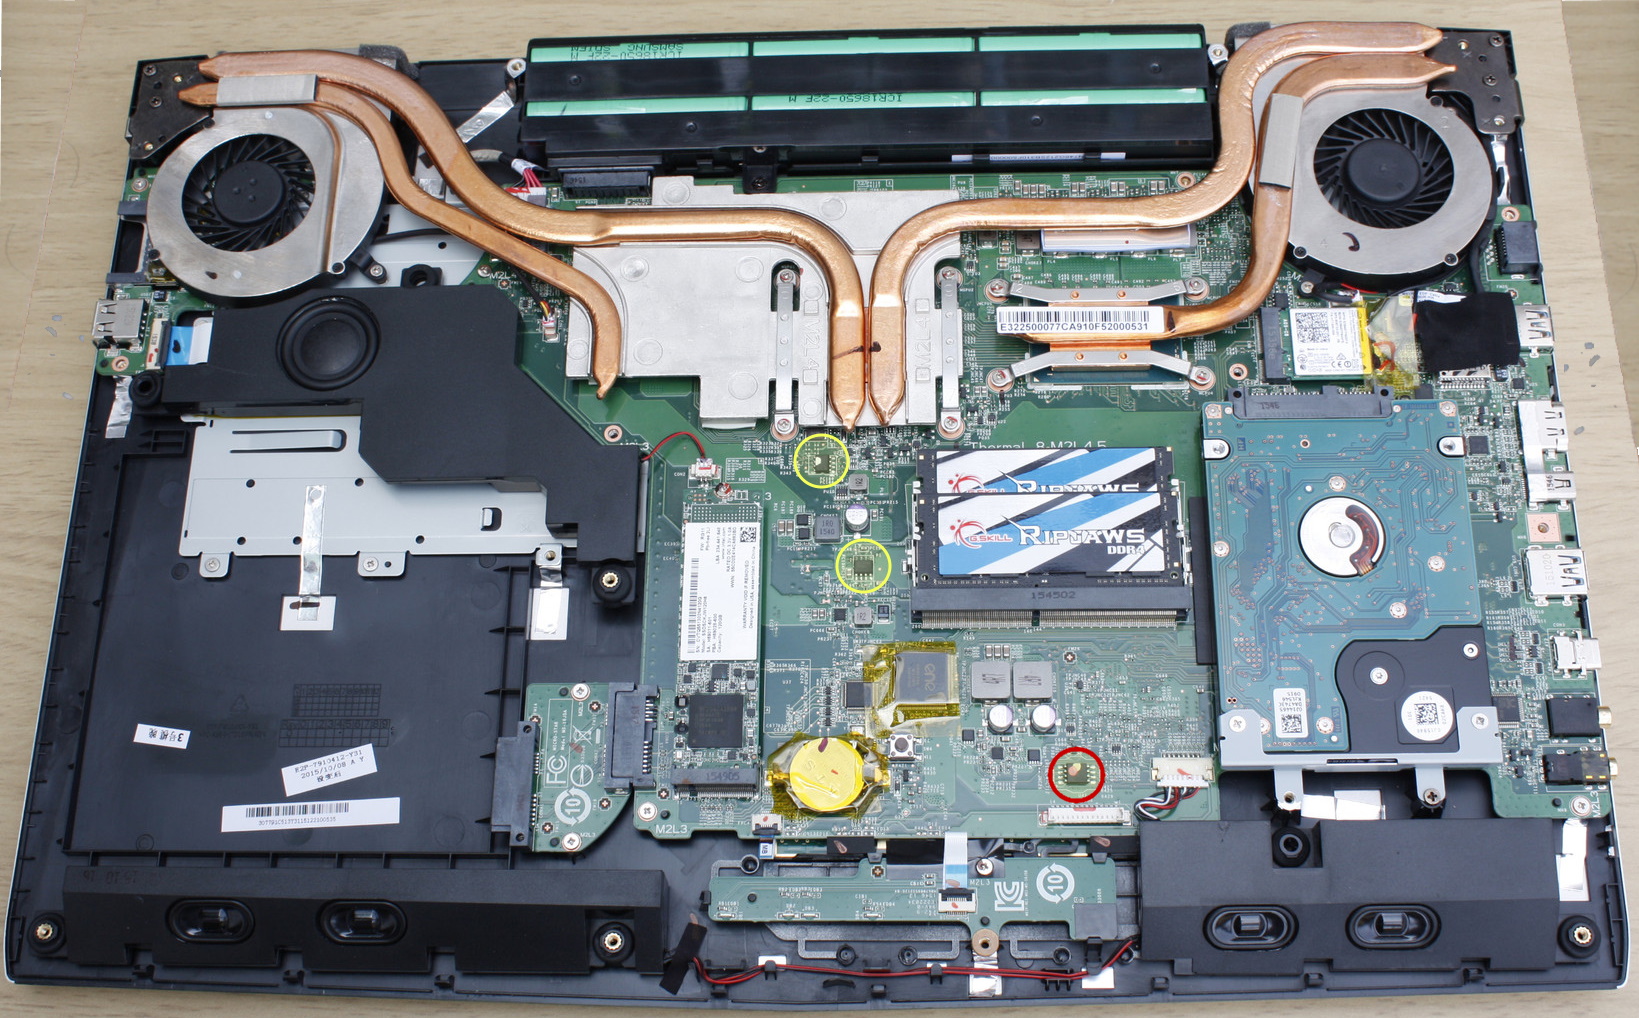
So this was it, let’s flash the EEPROM. The CH341A is compatible with ICs with the terminology x25XXX and x24XXX. This matched the identified Winbond SPIflash. All is needed now is to connect the clip to the EEPROM. There are several programmers compatible with the CH431A programmer, and I picked AsProgrammer (Windows-only), available here 4.
Some considerations:
- The red cable symbolizes the pin 0, so be careful to connect it accordantly both in the CH341A and in the motherboard (a dot mark symbolizes pin 0).
- Connect everything before plug the USB port. Messing around with the clip while the USB is connected can lead to bluescreen-like side-effects.
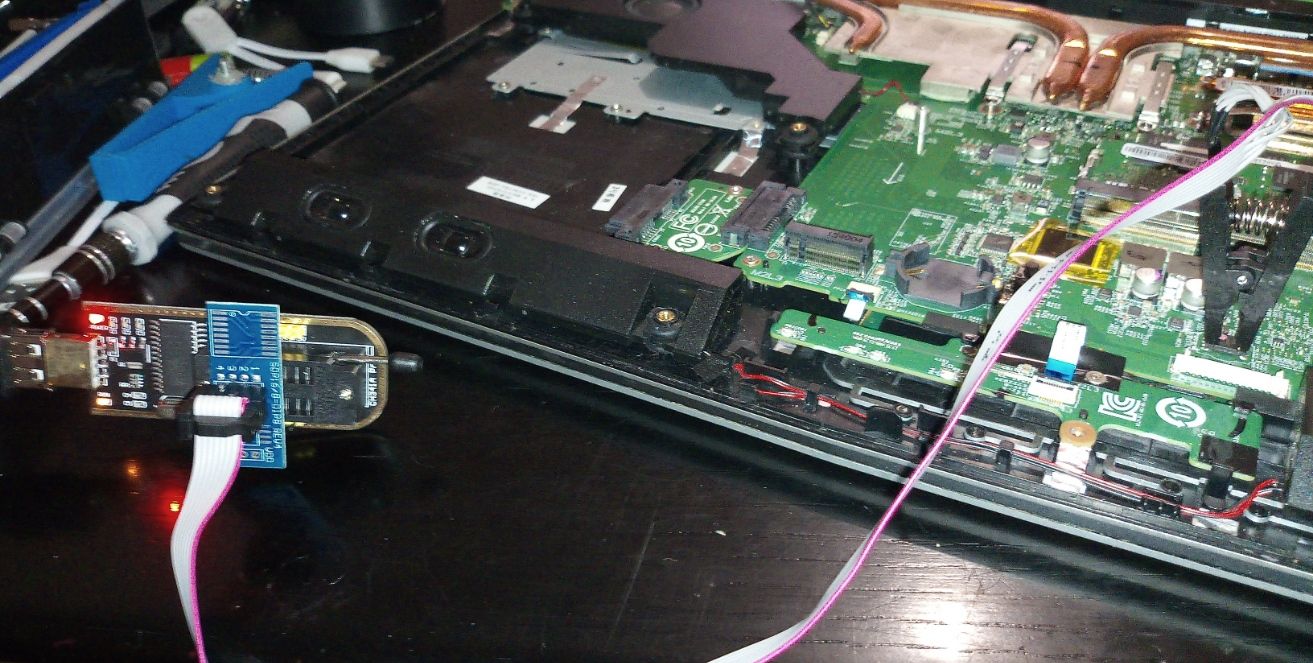
Connecting the USB port and opening the AsProgrammer allowed me to read and write from the chip, yey!
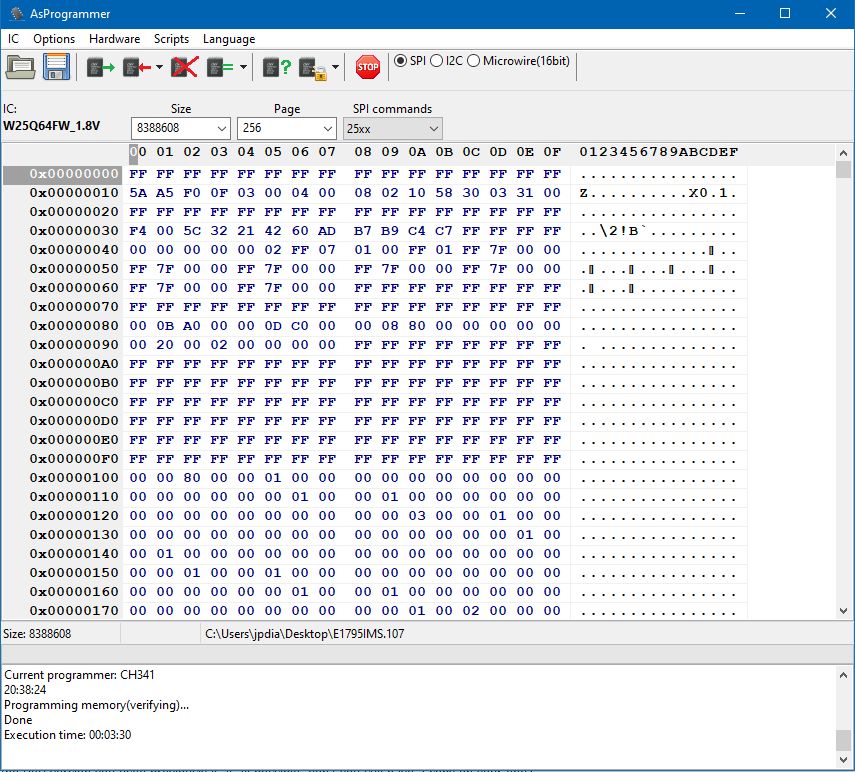
So, after dumping the current (and, believed, broken) firmware to a file, I flashed the chip with the latest version from the MSI support website. After rebooting the PC, it reset a few times, and then the BIOS screen showed up!
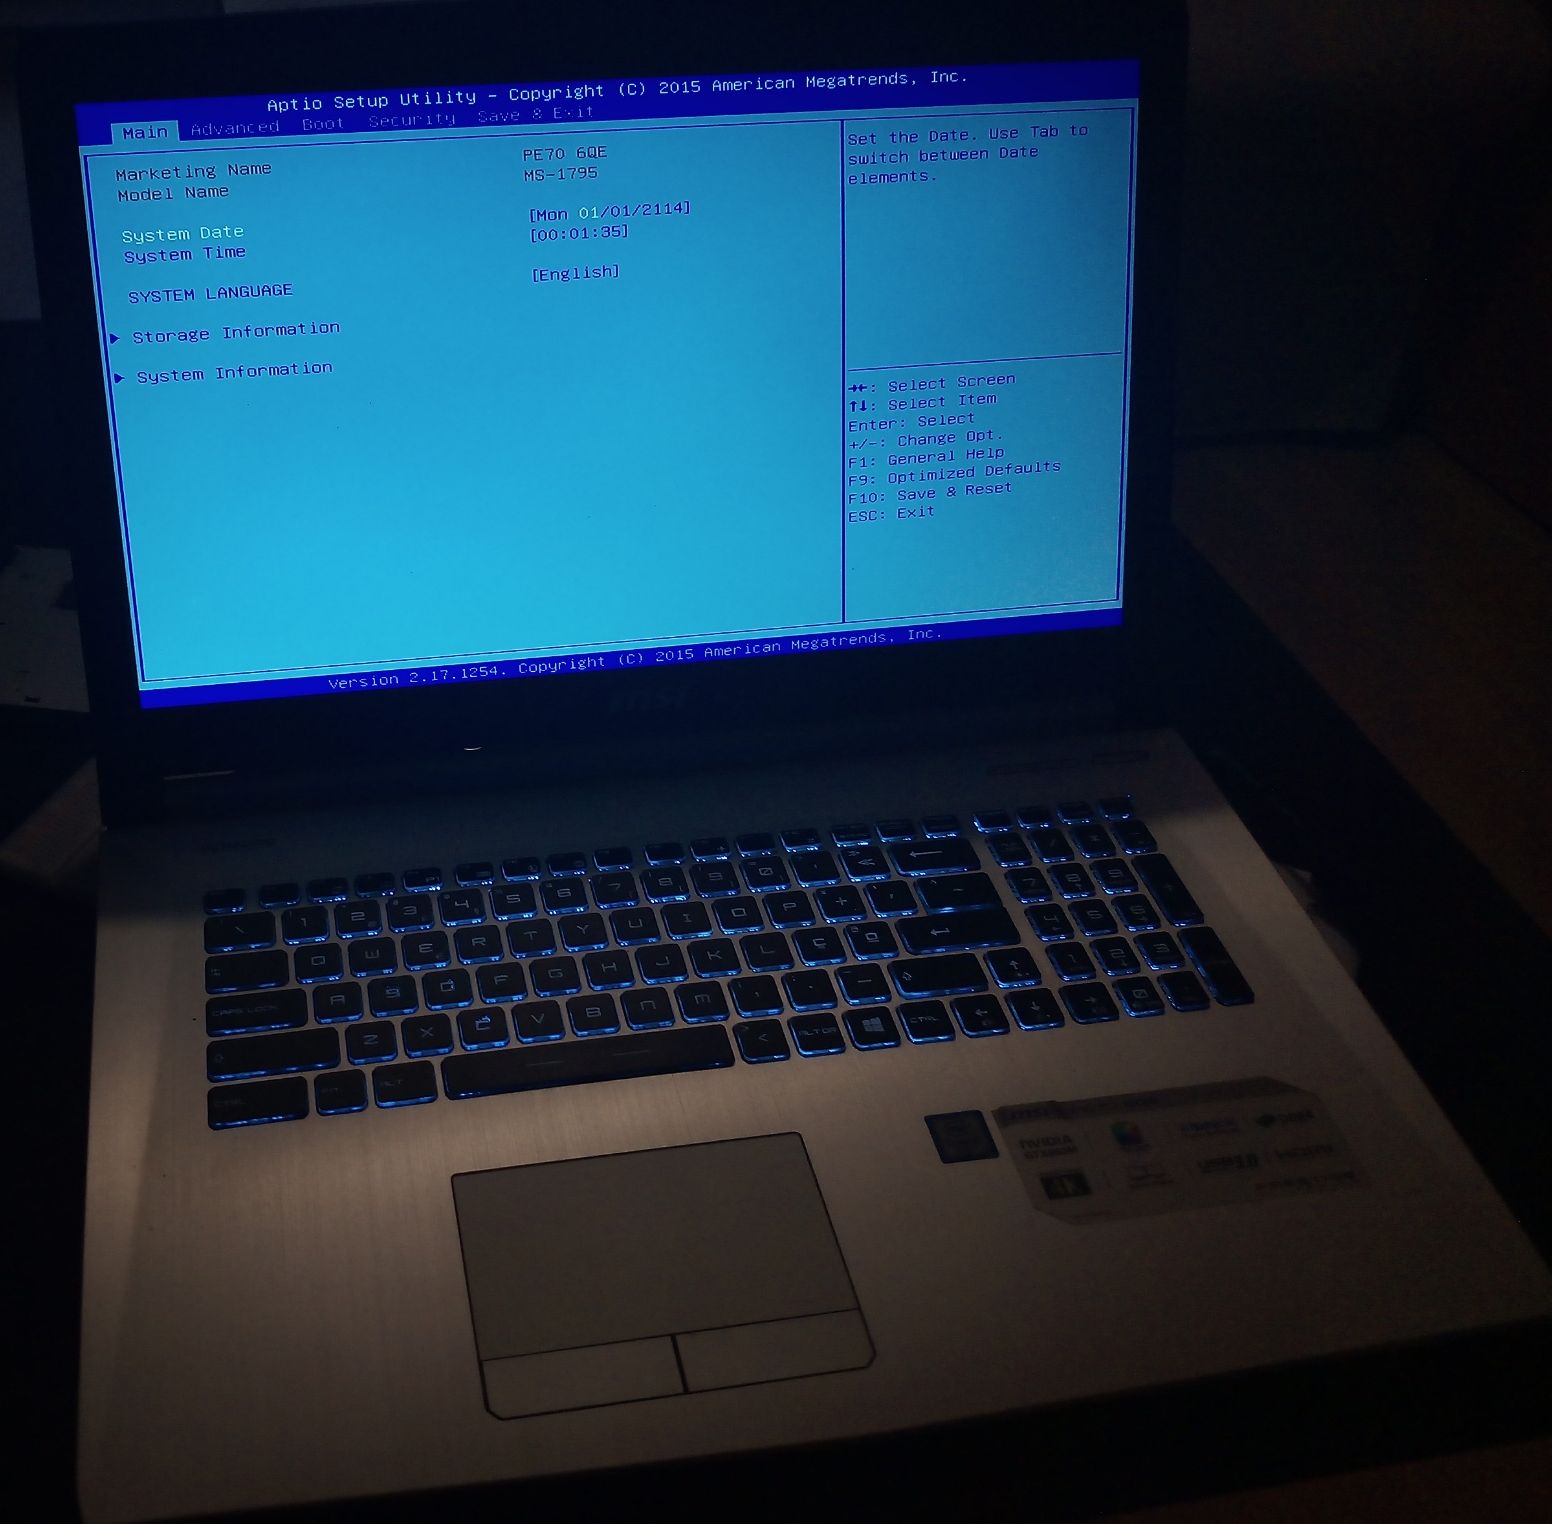
SUCCESS! Everything went better than expected. I was able to correctly set-up everything, format and install Windows 10. It’s now up and running after being declared dead by two different hardware stores.
References
-
Just as a reminder, there is absolutely no official documentation (such as schematics) about the motherboard. ↩
-
Another useful source I found later on: [REQUEST] & [HELP] MSI PE70-6QE BIOS mod via CH341A ↩
-
Documentation and other tools for CH341 are available in this repository. ↩