From a NAS to a full-fledge homelab with spare parts
It all started with a QNAP NAS to backup my raw photography’s and have some way to store other media files. Then some smart home devices randomly appeared. And then some enhancements needed to be done to a proper way to stream audio and video to my LG dumb smart TV. Then an UPS to safekeep the system operation. And from simple things with simple goals, piece by piece, we end up with a complex soup of things that somehow work. This details what I call my current homelab, and gives the main ideas on how you can build one yourself… if you really want to.
Ground Zero: The NAS Quest
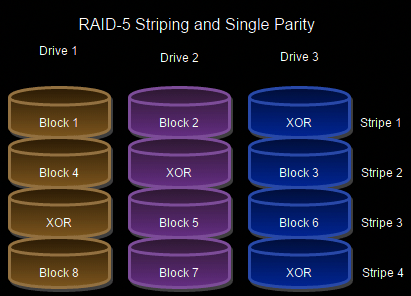
So, complex things start with the simplest of the objectives, in the case, storing and backup my always growing storage of both RAW and processed photographs from my other hobby. After some evaluation of the available alternatives I ended up with a QNAP TS-328 3-bay NAS with 2Gb of RAM with RAID 5 support. Loaded it up with 3 4Tb 3.5 HDDs and we are up and running with 8Tb usable storage.
Of course the minimalist purpose of storing photographs was only the start. Soon after I started dumping my media library into it and streaming it to my devices via the old DLNA. And struggling with the bad performance of the transcoding of the ARM Cortex-A53 4-core 1.4 GHz processor (even if it says that supports up to 1080p) — the secret lies in stating “up to” and not fully support it.
Other things were fun to play with, like the third-party library of apps available and the ability of running containers!
Also, for remote access, while in the past I used to setup a OpenVPN server, open router ports and so on, that’s the old way of doing things. Nowadays I always use Tailscale as it makes everything more secure (Wireguard without needing to open ports on the router, what else can you ask for?) and easy (giving access to other users is as simple as sending an invite via the Tailscale portal). Ah, and it also has really well done applications for all operating systems, including an app for QNAP (I know, I’ve become a little of Tailscale fanboy myself).
The Plex Episode
So there is this thing called Plex, or more concretely Plex Media Server, that you can setup basically anywhere (containers, you know the drill). So the idea is, maybe, I could set up some Raspberry Pi with this Plex thingy, mount my QNAP storage and just index the media that I have. This would come with the plus of proper indexing and navigation with covers, nicer UI than what’s bundled up with TVs for DLNA streams, and so on.
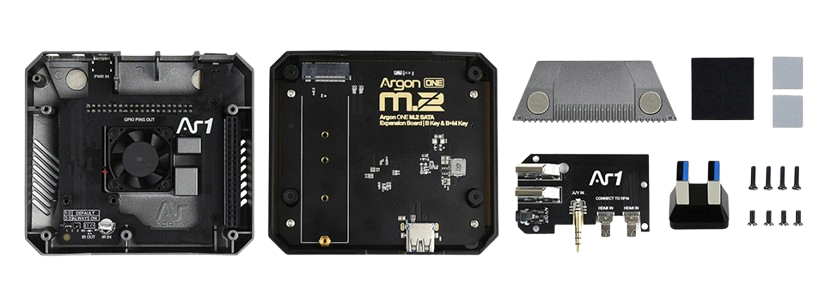
So I fetched my unused Raspberry Pi 4 with 8Gb of RAM from the shelf, set it up with a Argon ONE M.2 case with SATA SSD extension. I set it up with an 20€ 256Gb SSD Verbatim Vi560 and it worked perfectly… for a total of 3 months — Verbatim, I will never trust your products again.
But, before the SSD disk fail story, the system was up and running. Mounted the QNAP folder with fstab (just adding a line to /etc/fstab):
//<qnap_address>/Public /mnt/qnap cifs username=<user>,password=<password>,x-systemd.automount 0 0
For running Plex on Docker the easiest way is to use the well-crafted images provided by LinuxServer.io.
---
services:
  plex:
    image: lscr.io/linuxserver/plex:latest
    container_name: plex
    ports:
      - 32400:32400
      - 1900:1900/udp
      - 5353:5353/udp
      - 8324:8324
      - 32410:32410/udp
      - 32412:32412/udp
      - 32413:32413/udp
      - 32414:32414/udp
      - 32469:32469
    environment:
      - PUID=1000
      - PGID=1000
      - TZ=Etc/UTC
      - VERSION=docker
      - PLEX_CLAIM= #optional
    volumes:
      - /plex/data:/config
      - /mnt/qnap/tvseries:/tv
      - /mnt/qnap/movies:/movies
    restart: unless-stopped
This allows you to access plex directly via the browser. However, if you want to install Plex on your TV, phone, and so on you need a Plex account, with it you can obtain the Plex claim token to basically associate your local library to your account. Which, at the end of the day, forces you to have a Plex account just to access your own stuff… not cool, but something I could live with, at least for a while.
It’s not DNS. There is a no way it’s DNS. It was DNS.
So, with QNAP and Plex running, why not rollout your own DNS service? In the past I have used both Pi-hole and AdGuardHome with different levels of success. My first idea was to run it directly on the Router, as I have a TP-Link Archer C7 AC1750 which is full-fledge compatible with OpenWrt. OpenWrt has a really good guide on how to run AdGuard on it, however the flash storage was not enough for it. Fear not, we can extend the RootFS with a USB storage device. And everything worked great! The problem was the stability of the service, as the router started to misbehave after a few weeks of uptime, requiring recurrent reboots to keep everything working — not great, but not too terrible.
While I was at it, also better configure this Raspberry Pi as part of my Tailscale tailnet. But not as just another node, but an exit node, giving me something closer to a typical VPN, in a way that I can access all of my home network devices.
However, after some episodes of issues with DNS resolution, I went with the more stable version of running it on the Raspberry Pi, alongside with Plex. This solution kinda of works, but if for some reason the Pi failed (looking at you again, Verbatim), this became a single point of failure (as the announcements of DNS servers available on the networks were not really working properly and fallback to external DNS resolvers as expected when the main one had failed).
Meanwhile I decided to invest in a more recent router, with support for Wi-Fi 6, and the choice was a Asus TUF Gaming AX4200 as it is fully compatible with OpenWrt and has 256Mb of flash and 512Mb of RAM which would be more than enough to run AdGuard. But for now, I will keep with the stock firmware as it is performing well and stable and will resort to the default Adguard public DNS servers to block most of the things without the complexity of running my own DNS service.
The Home Automation Adventure
Nowadays having some surveillance cameras is common practice, in my case I opted for a few (3x) IP66 rated TP-Link TC65 3MP Wi-Fi cameras with Night Vision for outdoor use. They work perfectly well out-of-the box via the Tapo app even under bad weather, and allow local access via a configurable RTSP stream. Given that, I decided to extend the range of products and brought two more cheap indoor cameras (Tapo C200), and a few (4x) Tapo P110 Plugs with built-in energy monitoring. All of it a joy to use.
But over the years I had accumulated a lot of Smart Devices with the most diverse protocol landscape, including some cheap Xiaomi Mi Humidity and Temperature sensors with BLE that I use to monitor my house comfort (as I wrote previously here). And while I could spend more money and buy the proprietary sub-GHz sh!t that Tapo created to home sensors, I finally decided to give a second chance to Home Assistant. I say second change as the first time that I went by that road I totally regretted it, as it was a mess of software, without proper backup strategies, fragmentation of components within the UI, and so on.
But this was a side-quest, and let’s get back to the main story, as the endeavors of trying out Home Assistant were, let’s say, delayed.
The Verbatim Disk Fail
After three months of smooth operation, I started to have misbehavior’s. Plex not responding, Raspberry Pi not responding, etc. My first option on the table was some kind of issue with the Argon case, as it needed to provide enough energy to the SSD to be able to operate, and this was a known issue in the first revisions of the Argon case. A lot of hours were lost, a lot of tearing it apart and rebuild it again, lot’s of SSD formats, and the story goes on. The Raspberry Pi simply didn’t boot in the most of the occasions, going straight to the BIOS screen that would claim ‘no bootable disk found’. And this was true, because as soon I flashed a USB drive with a random Linux distro, the Pi booted correctly.
Eventually, after a lot of trial and error, the SSD simply and consistently died. And it was the culprit from the beginning. Oh well, disks fail, maybe not so fast…
From Scratch
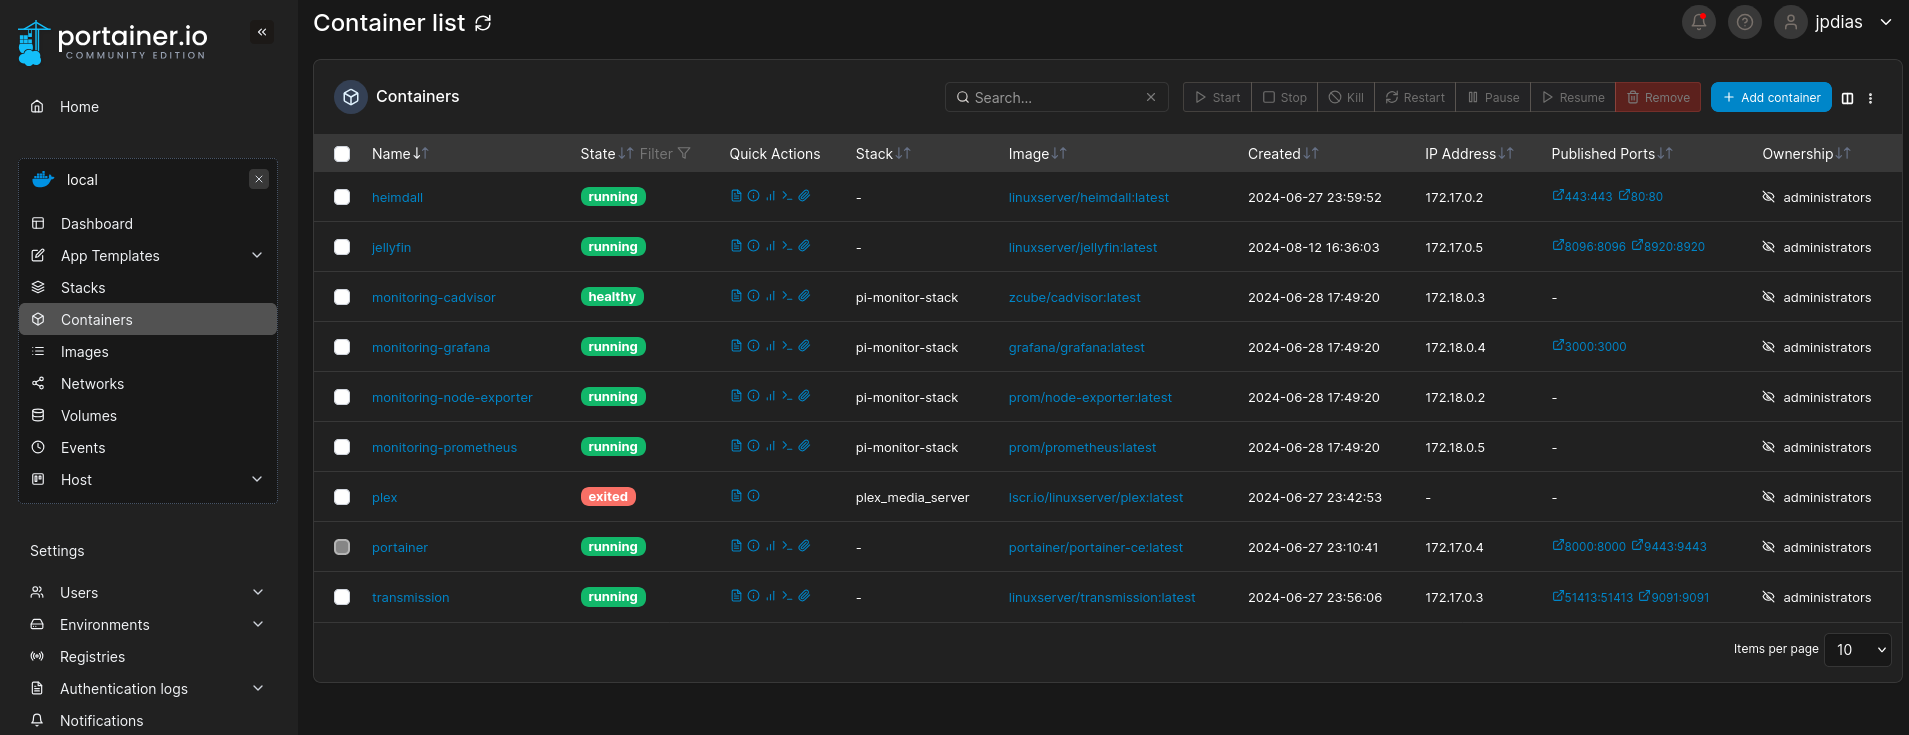
So, disk fail. Let’s re-do everything from scratch, with some lessons learnt. First off, I scavenged a old WD 256Gb SSD from a no longer used laptop (project for another day) and formatted it with the same Raspberry Pi OS Lite (basically the bloatware-less version of the Raspberry Pi OS). After that setting up the essentials, including Docker. But managing Docker-compose stacks by hand it is just… boring. Thus I decided to go full-fledge to Portainer. It gives you a nice UI for managing all your container stacks, and a kind of library to find software, so called “App Templates”. Which makes things easy to deploy new software.
Given that it was a matter of setting up some core software:
- Jellyfin, finally a nice alternative to Plex, without the bloat and mandatory accounts garbage;
- Heimdall, a minimalist application dashboard working as a landing page to the Raspberry Pi (but I’m looking at you Homepage, as you seem a promising alternative);
- Transmission as a service to download random stuff directly to the NAS, yarr!;
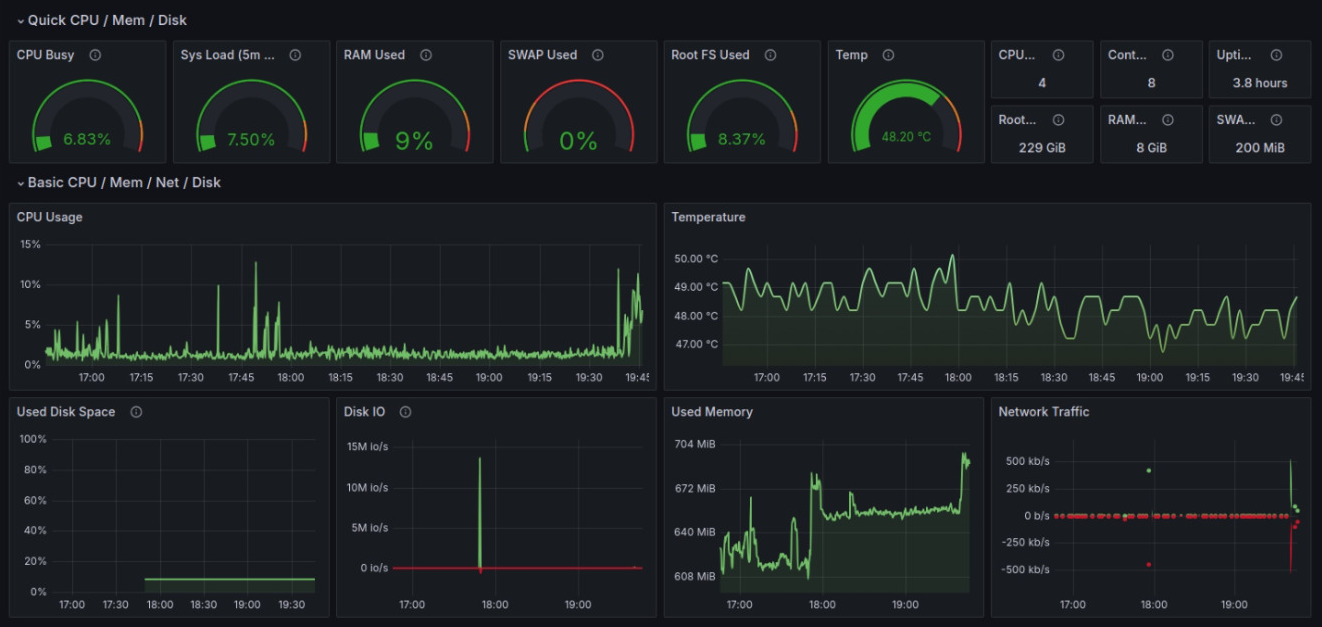
- Grafana, cAdvisor, Prometheus, and Prometheus node exporter working as a nice monitoring stack, specially to control the temperatures as the Argon case is not the best thing in terms of heat dissipation. Grafana was loaded up with the nice “Raspberry Pi & Docker Monitoring dashboard template by Oijkn
Talking about heat dissipation, Argon case comes with a piece of proprietary software that you can easy install to control a little fan that comes in the case. However, the software is not the best thing around, but there is a cool reimplementation that works top notch that allows you to configure the fan via I2C and control de case added on/off button.
And we are up and running!
Smart Home Pt. II
Now, getting back to the Home Assistant story. I took up one Raspberry Pi 3B that I had around (the minimal recommended to run Home Assistant, like why on Earth you need so many resources Home Assistant?!) and just flashed the out of the box image of Home Assistant on an industrial grade 8Gb SD card from Sandisk — let’s see how long it last, compared to regular SD cards.
After setting it up, surprisingly easy to do, I could add my Sonoff Zigbee dongle and it was automatically discovered and setup. Now I just needed some devices to “discover”. And while I had those cheap Xiaomi Humidity and Temperature BLE sensors laying around, I remembered that recently I found out that those things could be converted to Zigbee, so challenge unlocked… or not so much of a challenge, just go here and follow the steps (make sure that your devices are LYWSD03MMC or otherwise you will not be able to do this). And simple as that we have our Zigbee sensors up and running.
Next step was to integrate with the Tapo devices, both cameras and plugs. While the plugs were plug and play (pun intended), the cameras not so much, and forced me to delve into the jungle of HACS that I totally would recommend to stay away of if you can as this HACS sometimes work in fun ways… but after finding the right HACS, it was ready to go, cameras integrated.
Last thing remaining was my hacked Ikea Vindriktning Air Quality Sensor, to which I added an Wemos D1 for streaming PM2.5 readings over the air, plus a BME280 to add humidity, temperature and pressure monitoring to the unit. Here the easiest way to go was to just use ESPhome instead of custom code, as it integrates really well with Home Assistant.
uart:
  rx_pin: D2
  baud_rate: 9600

sensor:
  - platform: pm1006
    pm_2_5:
      name: "Particulate Matter 2.5µm Concentration"

  - platform: bme280_spi
    temperature:
      name: "BME280 Temperature"
    pressure:
      name: "BME280 Pressure"
    humidity:
      name: "BME280 Humidity"
    cs_pin: D5

switch:
  - platform: restart
    name: "Device Restart"
I will not delve into the IKEA Vindriktning hardware hack itself as there are plenty of tutorials out there on how to do it. Just want to point that this is, by far, one of the easiest things to hack out there, with easily accessible power and data lines, and plenty of space for additional hardware inside of the “box” (however, the heat of the components shifts a bit the ambient temperature read by the BME sensor).
Of course, I also added the Home Assistant Raspberry Pi to my tailnet as a node, as it makes it easier to share access to it.
The Finale (Current Setup)
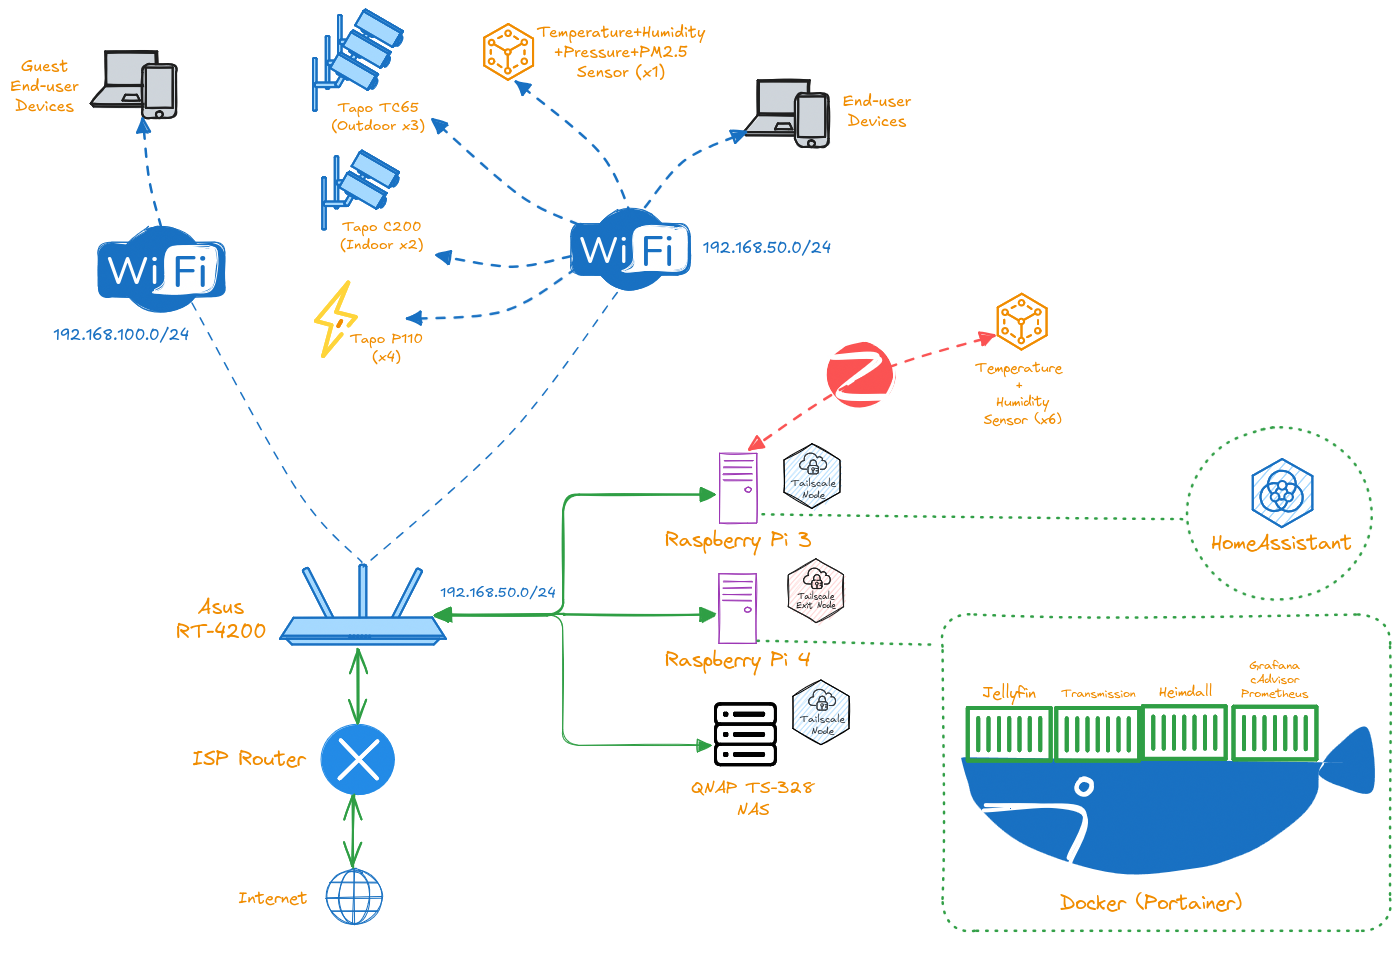
At last, the grande finale1. As stated in the beginning, simple things with simple purposes end up being complex if you give to them enough time. I brought the NAS more than 4 years ago now, and it made part of a lot of different setups, being the only piece that still stands the test of time in this big ball of mud. If you are here, maybe you are considering building your own thing, either an homelab or a smart home setup. The only piece of advice that I have for you is to try to keep the mess to a minimum, other that that, just don’t trust it in life or death situations (that’s why my smoke sensors work purely offline).
Footnotes
-
All of this system parts is backed up by an Cyberpower UPS BR700ELCD 700VA 420W 8 Sockets with Surge and Spike Protection, and recommend that you should do the same, specially if you have an NAS. Connecting the UPS USB connection to the NAS automatically sets up the NAS to enter in safe mode if the UPS kicks in, which is a nice thing to have. Also, having network connection even when the neighborhood lights go out is nice. ↩
